Perfect for fighting giants...
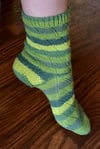
These unusual socks are knit on the bias from the cuff down and can be made with or without a side cable. The scalloped leaf pattern twists in opposite directions on the two feet, making for lovely symmetry. A flattering sock for any gender. Cast on and begin your magical knitting adventure today!
PROJECT LEVEL: Intermediate
—
Digital download includes:
- PDF (standard) - best for printing or for sighted knitters
- PDF (standard) - cable charts
Refer to “Accessibility” below for more information about file types.
About Design
Construction
Socks are worked in the round from the cuff down with a heel flap and gusset, then worked in the round to the raglan decreased toes and finished with grafting. Designed with slight negative ease.
Variants
Make socks with or without the spiralling chain cable.
Sizes
When choosing a size, round up.
- Youth or Adult Small: 8.5 to 9 inches (or 21.5 to 23 cm) instep circumference.
- Adult Medium: 9.5 to 10 inches (or 24 to 25.5 cm) instep circumference.
- Adult Large: 10.5 to 11 inches (or 26.5 to 28 cm) instep circumference.
Supplies
Yarn
2 balls fingering-weight sock yarn with 199 metres in 50 grams (or 218 yards in 1.76 oz).
Approximate yardages: 283 (305, 370) yards [or 259 (279, 338) metres].
Needles
Set of four 2.75 mm (US size 2) double-pointed needles (or, optionally, two circular needles of this size instead) OR size needed to obtain gauge.
Notions
A small cable needle, a yarn needle, and up to ten stitch markers.
Gauge
34 stitches and 47 rounds = 4 inches (or 10 cm) over stockinette stitch knit in the round.
About Samples
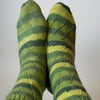
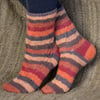
Striped Samples:
Knit Picks Felici Fingering Weight, a 75% merino wool and 25% nylon fingering-weight yarn with 199 metres in 50 grams (or 218 yards in 1.76 ounces) that knits up to 28 to 32 stitches in 4 inches (10 cm) on 2.25 to 3.25 mm (US 1 to 3) needles over stockinette knit flat.
- Green Colourway: Spring Mix.
- Orange Colourway: Maple Leaves.
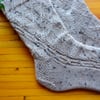
Tweed Sample:
Knit Picks Stroll Tweed, a 65% Superwash merino wool, 25% nylon, and 10% Donegal tweed fingering-weight yarn with 211 metres in 50 grams (or 231 yards in 1.76 ounces) that knits up to 28 to 32 stitches in 4 inches (or 10 cm) on 2.25 to 3.25 mm (or US size 1 to 3) needles over stockinette stitch knit flat.
- Colourway: Oyster Heather.
Techniques & Resources
Skills you will need:
- Knit
- Purl
- Make a gauge swatch in the round in stockinette stitch
All other required stitches are explained.
Techniques used:
Included resources:
- A comprehensive list of links to online tutorials on my website for necessary skills. Tutorials are screen-reader accessible, with instructions relayed fully in text, and also include videos and downloadable photo tutorials.
- Full glossary
- Cable charts and fully written instructions
Publishing Information
Release Date: December 1, 2015
Most recent revision: November 14, 2023
Publisher: My Secret Wish Publishing
Knitting pattern type: Multiple Design Options
Project type: Socks
Page Count (standard Bookmarked PDF): 20
ISBN (Bookmarked PDF): 978-1-989800-54-6
COPYRIGHT AND LICENSING NOTICE:
This pattern is copyright My Secret Wish Publishing. Your purchase of this pattern gives you the right to use it for personal, non-profit use only. To license the pattern to use for profit, please e-mail me for permission. You do NOT have the right to print the pattern for other people (unless they reside in your household) or to transfer the digital file to any other person. This pattern may not be sold, copied, or distributed in any way.
Update History
November 14, 2023:
- Revised formatting of PDF to align with current template style.
- Clarified language where necessary.
- Converted PDF to be screen reader accessible.
- Updated URLs for new store and social links.
- Renamed to "Beanstalk Socks" (originally “Jill and the Bean Socks”)
- Revised and corrected errors.
- Added two more sizes.
- Added charts.